AFP-Nimble AMS Project: Phase 2 Testing


Thank you again for your assistance in testing the new Nimble AMS database. As noted in the July 27 demo (video link: https://vimeo.com/734106410 | PW: AFP2022), our main focus in this second phase of testing is to review our requirements involving customizations based on AFP business rules.
- If possible, please test in an Incognito browser or private browser window so your testing accounts and logins do not get stored or cause issues with repeated testing.
- You may get prompted to generate a verification code to get into the staging environments. These come to me – so if you generate a code, please email me or text me at 202-258-6868 to let me know so I can forward the code to you.
- Please send all issues and feedback to nicholas.ricci@afpglobal.org. All identified items will be worked through. Remember to indicate which scenario you are referencing, as well as the steps you took so we can replicate your testing results.
- Note that while we have initially uploaded current data to Nimble, we are still working through data mappings and thus it may not be exactly “right” at the moment.
- In addition, product/membership pricing and categories may appear incorrect or show test amounts - this too will be updated over the next month.
High-Level Nimble AMS Remaining Project Schedule
- Phase 2 Testing: Demo - July 27, 10am-12pm | Testing Period: August 1-11
- End-to End Testing: August 22-September 2
- Staff Training: Wednesday-Thursday, September 21-22
- Tentative Go-Live: Tuesday, September 27
Testing Scenarios and Identified Departments Which Should Test
*Click here to see a list of Testing Accounts for you to use for your testing.
MEMBERSHIP
CHAPTER ENGAGEMENT
SALES/ACCOUNTING
PROFESSIONAL DEVELOPMENT
FOUNDATION
1. Online Join
Goals:
- Verify a website user is able to create an account and join, appropriate flow and business rules/options in place.
- Make sure Staff can create new accounts in Admin.
Testing Perspectives:
- Website user without account – nonmember
- Staff
Testing Credentials:
- Website user without account – nonmember: You will create your account in this Join testing flow, so make note of the login created for this new Join.
- Staff: See Testing Accounts at end
Testing Scenarios/Flows:
Website User: Create a New Account and then Join
- Create an Account: To create a new account, go to: https://staging-jumpstart-1790fa9468d-17a2bfa13f4.cs209.force.com/communityhub/nc__createaccount?startURL=%2FNC__Login%3FstartUrl%3D%252Fcommunityhub
- Create your user account – create accounts for someone in US, Canada, Mexico, other countries. Make note of the accounts and logins you create for the next parts of testing
- Once an account is created, you will be taken to your “Personal Snapshot” page in Community Hub.
- To Join, click the “Add Membership” link in the left menu (second item)
- Please use each of the accounts you create to test the different Join options (make note of the birthday you enter to test YP), chapter selections, etc. (note: Join options, chapter regions, working and pricing work still in progress)
- Make sure you can proceed through check-out. Note: The test platform may only let you check out if your total is an odd number – a quirk of test environment (Use 4111 1111 1111 1111 as test credit card, enter future date for expiration, any number for code)
Staff-Side: Create a New Account in Database
- To create a new Account:
- Go to Nimble - https://test.salesforce.com/ - and log in using a Staff login
- Open the Accounts tab and Click on the “New” button top right
- Select Record type = Individual
- Add some Account information pop opened module, the click Save.
- Next, you need to enable the new Account to use Community Hub:
- Open the above Account you just created.
- Click on the Enable customer user button from the quick action list in the top right corner.
- For User License, select “Customer Community Login”
- For Profile, select “Community Hub Login User”
- Add additional related information as may be required when creating a new account and save the record.
2. Online Renew
Goals:
- Verify a logged in member can renew their membership.
Testing Perspective:
- Logged in website user (member)
Testing Credentials:
- Use the account you created in Join testing process, above (for testing we are allowing members to renew at any time, to be changed to renewal period later).
Testing Scenarios/Flows:
- Go to Community Hub - https://staging-jumpstart-1790fa9468d-17a2bfa13f4.cs209.force.com/communityhub/NC__Login
- Log in using an account you created in the Join testing phase.
- Click “Add Membership” to start renew flow testing.
3. Seated Memberships Orgs (Large NPO)
Goal:
- Make sure Large NPO can be created and organization’s primary contact can manage these seated memberships online through Community Hub
Testing Perspective:
- Staff
- We Organization manager – see below
Testing Credentials:
- Staff - See Testing Accounts
- Organization manager – see below
Testing Scenarios/Flows:
Staff
Placing the Large NPO order in staff view:
- Go to Nimble - https://test.salesforce.com/ - and log in using a Staff login
- Go to Accounts and either create or select an already existing Organization record
- If creating a new one: In Accounts, from upper right navigation, select New and create – be sure in “Primary Company Affiliation” to select an Individual as an employee (child affiliation) for testing purposes. If using existing company, make sure it has an individual account as an employeechild affiliation.
- Next: Create a Large NPO order for this company
- Click on the company you just created, then click the top right down arrow to the right of the company name and select ”New Order” from dropdown
- Select “AFP” as the entity, and Membership as the product type.
- Select the Membership Type (“Large NPO”)
- Select your Primary product in the upper frame (radio buttons)
- Select the Chapter products you want in the lower frame (check boxes)
- For each chapter product you select, indicate the quantity in the field found on each line (e.g., Arkansas – 5, Virginia – 3); The total should add up to the number of seats you’ve selected on the primary product in the frame above.
- Click the blue button *at the bottom* of the page to save the items to the cart.
- Verify the items in your cart. Click the button on the right side to move to the payment screen.
- On the payment screen, click to make a payment (check is easiest for testing).
- When payment is made, click the blue button on the right side “Submit Order”
Website User (Large NPO company manager)
To test assigning the seats as a company manager:
- When done setting up Organization record above, open the Organization account.
- To impersonate the company manager who would log in to manage the sets, go to the Child Affiliations box and first click on the dropdown arrow to make sure this person is assigned the “Company Manager” role (this box needs to be checked for the following to operate).
- Next, click on the employee name in the Child Affiliation box, then click the top right navigation button “Log in to Experience as User” then select “Community Hub”
- In order to add individuals to the Large NPO membership, you first need to make sure these individuals are affiliated with this company in general.
- To do that, first click “My Company Affiliations” in the left menu, select the company name under “Current Company Affiliations” and select “Manage Roster”
- Next click “Actions” and select “Add Individual” – find or create some individual accounts and add them to roster.
- When done adding to roster, you will then need to add them to the large NPO seats
- Click “Membership Management” in the left menu – you should see the Large NPO option appear – click the Manage Seats button.
- First Assign the seats of the company membership.
- Then, click Chapter Assignment to assign the chapter membership seats.
- When done testing assignments, click log out to leave the impersonation experience and return to the admin and go to the Organization. Go down to the Membership section of the Org’s profile and click View List link next to “Active Seat – Chapter Membership” to see assignments
4. Print Subscription opt out
Goal:
- Logged in member can opt out of receiving the print Advancing Philanthropy magazine if they so choose to lessen their environmental impact. Aoppears in Joon flow as well as member’s “Personal Snapshot”
Testing Perspective:
- Website user with account - member (logged in)
Testing Credentials:
- Website user with account: See Testing Accounts at end or use membership accounts created as part of Join testing.
Testing Scenarios/Flows:
- Log in to Community Hub as a user with a membership
- Go to Edit My Profile in left navigation
- Change default opt-in status to instead opt-out status on the section labeled Opt-Out of Print Subscriptions, click Save.
5. Online Committee Nomination
Goal:
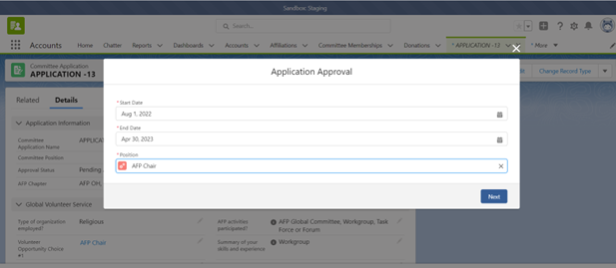
- Ability for AFP Global members to indicate interest in volunteering for an AFP committee through the website Community Hub. Process will collect applicant information and allow review in Staff View of each applicant for approval. Once the staff reviews the application, a process is run to update the start & end date and the committee position for the member.
Testing Perspective:
- Website user with account - member (logged in)
- Staff view
Testing Credentials:
- Website user with account - member (logged in): See Testing Accounts at end.
- Staff: See Testing Accounts at end or use membership accounts created as part of Join testing.
Testing Scenarios/Flows:
Website User: Test basic functionality how a member would access and complete the firm for review
- As a member, click on Committee application on left navigation bar as shown below. This shows the open Committee Application types available for applying, click Apply for “AFP Global Volunteer Service Form” to test the volunteer process form. Demographics fields are auto populated based on the Account details.

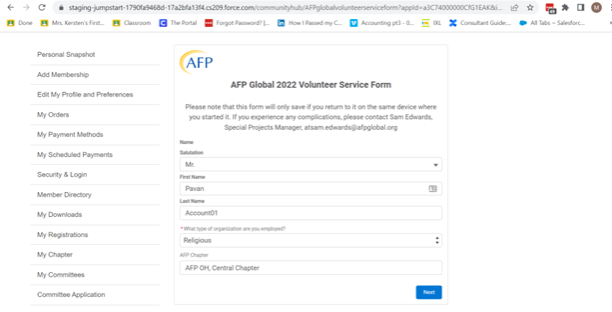
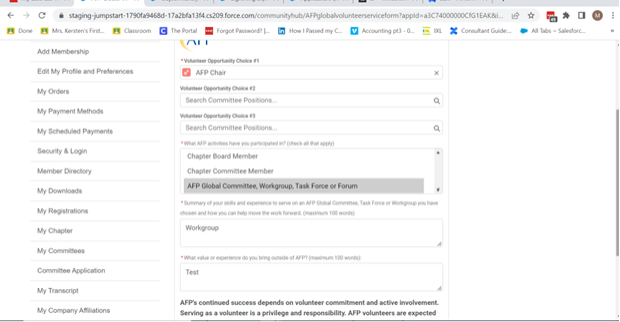
- The list of Positions that are open for nomination along with positions related to a Committee specified in the application form will be listed in the Volunteering position field on the form. For now, type/select “AFP Chair” as the #1 Volunteer Opportunity. Complete form and submit:
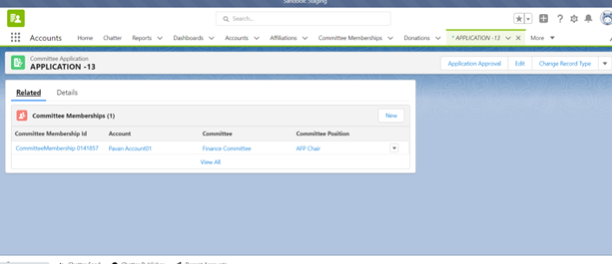
Staff View Test
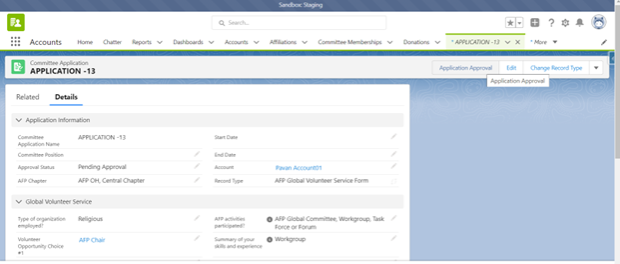
- Once an application has been submitted, an Application Record gets created in the Staff view. Go to the Member Account you just used to submit the application, then click “Committee Application” in their Related Links, or click the “Applications” tab (click left menu to find) and open a record.
- Staff can review the details and click the application approval to approve the application. Once approved a record gets created.
6. Chapter Events Attendee Tracking
Goal:
- Ability for chapter admins to (a) create an event in Nimble and to then (b) upload a list of attendees of that event to Nimble for tracking/recording purposes.
Testing Perspective:
- Chapter Admin
Testing Credentials:
- See Testing Accounts at end.
Testing Scenarios/Flows:
- Go to chapter portal - https://staging-jumpstart-1790fa9468d-17a2bfa13f4.cs209.force.com/chapterportal/s/login/
- Log in using a chapter admin account (below)
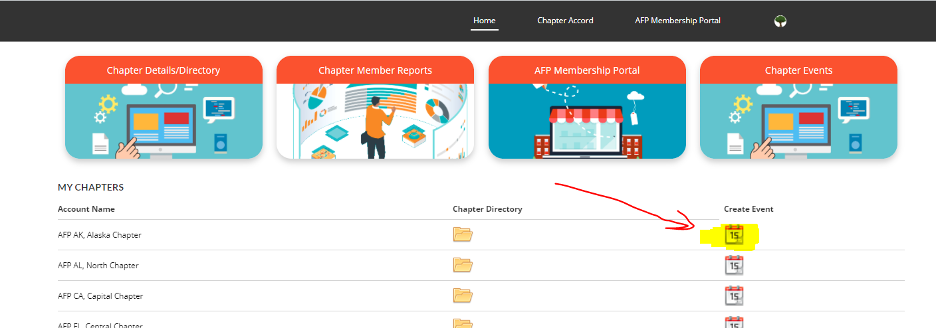
- On chapter portal landing page, click “Create Event” next to chapter name.
- This currently is more robust than we need at first. For Phase 1, we will just ask Chapters – when creating event in Nimble - to enter:
(a) Event Name
(b) Event Date
(c) Event Time
(d) Location
(e) General price
(f) CE credits (if any) - Feel free to walk through current set-up to see full possible for event set-up.
- To see the event you just created, click the “Chapter Events” button top right.
- Click the far-right dropdown arrow to Edit event if needed.
- Once event is created, chapters will be presented a template they can use to enter their attendees and then upload to the database – this information will be tied to the event they created.
Attendee information to be put into template:
(a) First name
(b) Last Name
(c) Email
7. Chapter Accord
Goal:
- Ability for Chapters to complete their Accord process online.
- Ability for Staff to track and review a chapter’s Accord submission.
- Ability for staff to indicate on a chapter record a chapter’s Accord status, 10 Star achievements
Testing Perspective:
- Chapter Admin
- Staff
Testing Credentials:
- See Testing Accounts at end.
Testing Scenarios/Flows:
Chapter Admin
- Go to chapter portal - https://staging-jumpstart-1790fa9468d-17a2bfa13f4.cs209.force.com/chapterportal/s/login/
- Log in using a chapter admin account (below)
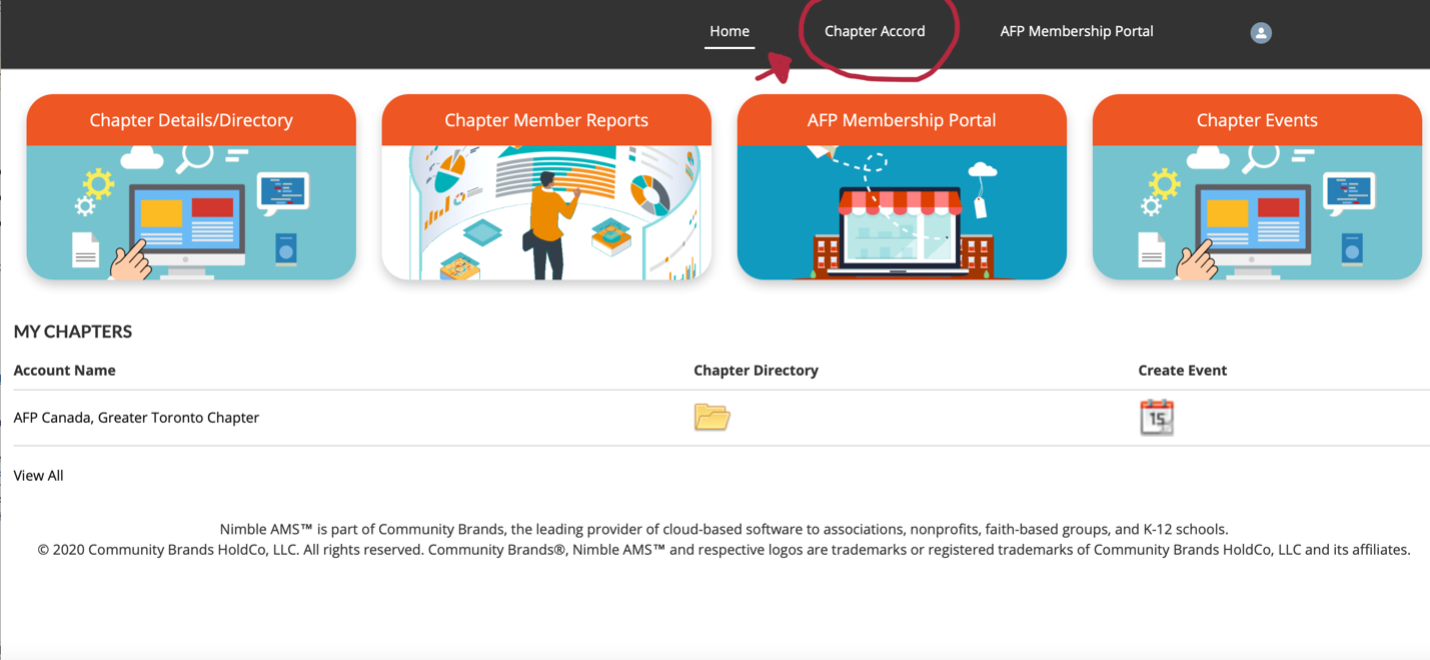
- Click “Chapter Accord” in top navigation
- Select the chapter for which you want to submit the Accord process. This should just show the chapter the admin is responsible for, but in cases where a logged-in admin actually admins for more than one chapter, then both will appear and they can select the one they want to complete.
- Go through and test the Accord process and flow – this flow mirrors the existing flow we current ask chapters to complete. Please make note of any edits, issues, etc. – compile and send to Nick once done.
Staff
- To see the chapter’s Accord submission, go to Nimble - https://test.salesforce.com/ - and log in using a Staff login. Under “Accounts” click Active Chapters then select the chapter you did the Accord testing for.
- In the Related List Quick Links, click “Chapter Accord Application” – click the application – the Details tab will show what they need to still do (this is editable by staff). Click the Related tab to see their uploads – staff can also upload files here.
8. Sponsorship/Exhibitor/Advertiser Management
Goal:
- Use Nimble to log, track and manage Sponsorship, Exhibitor and Advertiser activity and contacts, and track “prospective” opportunities (non-checkout record creation)
Testing Perspective:
- Staff view
Testing Credentials:
- Staff: See Testing Accounts at end
Testing Scenarios/Flows:
- Go to Nimble - https://test.salesforce.com/ - and log in using a Staff login
- Under Accounts, click any Organization/Company record to open
- Create a Sponsorship record for this company (this will be the same also for Exhibitor and Advertiser products we will add):
- Go to top right dropdown arrow and select “Add Sponsorship”
- Select the product type = Sponsorship
- Select the respective Sponsorship product
- Fill out fields
- Click “Next” to create.
- Edit a Sponsorship record for this company:
- Open the Company Account
- In Related List Quick Links, Click “Sponsorships”
- Click the Sponsorship you want to update
- Click Edit Record
- Make edits/updates and Save.
9. Course/Events Records Page | Online Certification Transcript Management Page
Goal:
- A logged in website user should be able to - for a specific completed date range - generate a list indicating AFP education offerings they have completed and we have recorded, including credits earned and date of completion.
- A logged in website user will be able to track and see progress on any Program we decide to set up in the database (e.g., the ACFRE application process, should we decide to bring this in-house) (STILL BEING DEVELOPED - NOT REQUIRED AT GO-LIVE)
Testing Perspective:
- Website user with account (logged in)
Testing Credentials:
- Website user with account:
Testing Scenarios/Flows:
My Professional Development Page
- Go to Community Hub - https://staging-jumpstart-1790fa9468d-17a2bfa13f4.cs209.force.com/communityhub/NC__Login
- Log in using this member account:
UN: beluga@butthead.com
PW: B1idxy82} - Click "My Professional Development in the left-hand menu
- User should see courses that we have in the database that we have a record of member user attending. Can sort by Date Range. More filters to come in future.
- Click "Print Transcript" to generate a PDF version of course listing that can be printed or saved/emailed as needed.
My Programs Page
- STILL BEING DEVELOPED - NOT REQUIRED AT GO-LIVE
10. Donation Recognition and Summaries
Goals:
- Staff can view the current donation giving levels for an individual or organization on their account page layout.
- Staff will be able to see a number of fields related to summaries of gifts given by that constituent
Testing Perspective:
- Staff view
Testing Credentials:
- Staff: See Testing Accounts at end
Testing Scenarios/Flows:
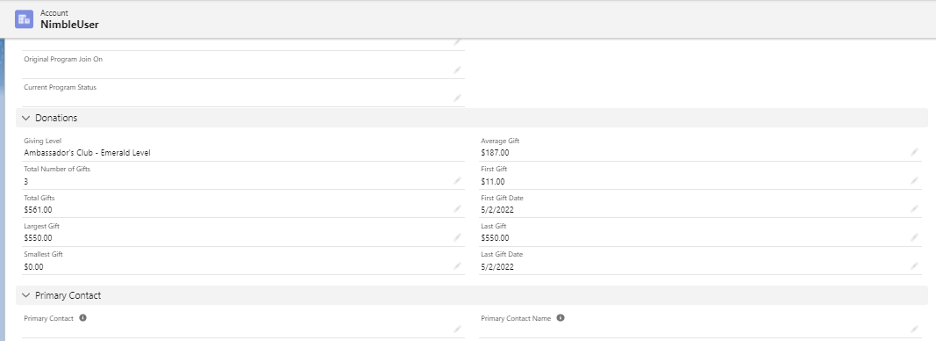
When staff views the Donation section of an Individual or Organization account, they should see the current giving level and fields related to summaries of gifts given by the individual or organization.
Individual Test:
- Go to Nimble - https://test.salesforce.com/ - and log in using a Staff login
- Open the App Launcher
- Navigate to the Account tab
- Open an Individual Account
- Create multiple donations for the individual by clicking "Donations" in Related List Quick Links section, then click “New”:
- They should be for different amounts
- They should be for different transaction dates.
- Once the donations are saved, then go through checkout flow to purchase the donations. You can indicate check or by credit card (make sure if credit card it is an odd number and use 4111111111111111 - expiration in future, any security code)
- Next, navigate back to user's account Detail screen.
- Scroll down to the Donations section - verify the fields in the Donations section are populated as expected.
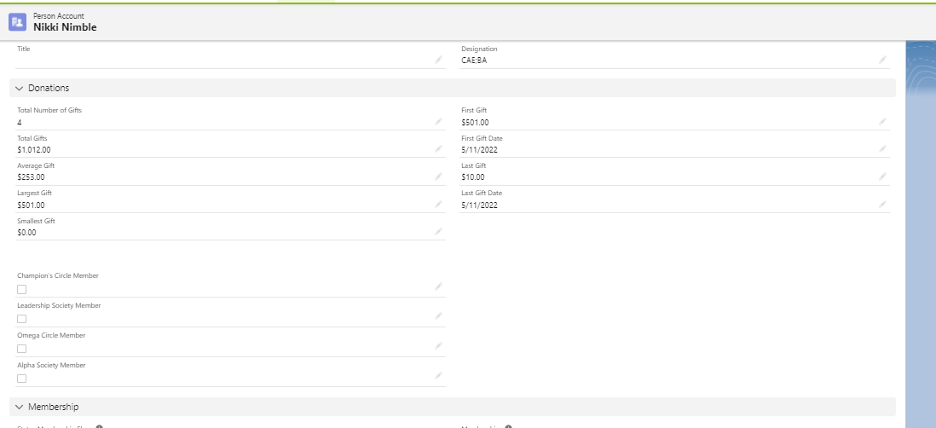
- The user will see the following fields and field types in the "Donations" section of the account detail view:
- Giving Level (text)
- Total Number of Gifts (#)
- Total Gifts ($)
- Average Gift ($)
- Largest Gift ($)
- Smallest Gift ($)
- First Gift ($)
- First Gift Date (Date)
- Last Gift ($)
- Last Gift Date (Date)
- Champion Circle (checkbox) Member
- Leadership Society Member (checkbox)
- Omega Circle Member (checkbox)
- Alpha Society Member (checkbox)
- All fields in the donation section will be populated with a value on open.
- The checkbox fields will default to unchecked
- Next, go to the Related Links area up top for this user and click "Donations" - you should see a record of every donation they made that you can click on to see the details.
Organization Test:
- Go to Nimble - https://test.salesforce.com/ - and log in using a Staff login
- Open the App Launcher
- Navigate to the Account tab
- Open an Organization account
- Create multiple donations for the Organization by clicking "Donations" in Related List Quick Links section, then click “New”:
- They should be for different amounts
- They should be for different transaction dates.
- Once the donations are saved, then go through checkout flow to purchase the donations. You can indicate check or by credit card (make sure if credit card it is an odd number and use 4111111111111111 - expiration in future, any security code)
- Next, navigate back to Org's account Detail screen.
- Scroll down to the Donations section - verify the fields in the Donations section are populated as expected.
- The user will see the following fields and field types in the "Donations" section of the account detail view:
- Giving Level (text)
- Total Number of Gifts (#)
- Total Gifts ($)
- Average Gift ($)
- Largest Gift ($)
- Smallest Gift ($)
- First Gift ($)
- First Gift Date (Date)
- Last Gift ($)
- Last Gift Date (Date)
- All fields in the donation section will be populated with a value on open.
- The checkbox fields will default to unchecked.
- Next, go to the Related Links area up top for this Org and click "Donations" - you should see a record of every donation they made that you can click on to see the details.
11. Advance Donation Requirements (adding donation history record without creating an order)
Goal:
- Staff should be able to:
- Add a new donation history record without creating an order in Nimble AMS
- Edit an existing donation record to update data related to the donation purchase - Logged-in Website User should be able to:
- Update fields during online donation process.
- Make a one-time payment during the online donation process.
- Make a recurring payment during the online donation process.
- Make a pledge/installment payment during the online donation process
- See a My Donation page
Testing Perspective:
- Staff
- Website user with account (logged in)
Testing Credentials:
- Website user with account - member (logged in): See Testing Accounts at end.
- Staff: See Testing Accounts at end
Testing Scenarios/Flows:
Staff
Add a new donation history record without creating an order in Nimble AMS.
- Log in as a staff user
- Open the App Launcher and select Nimble AMS
- Click the Accounts tab and change the list view to All Individual Accounts
- Select and open a person account to create a donation.
- Click the Add Donation button in the upper right of the screen.
- Begin filling out the Add Donation screens and select the "Next" button.
- When all input is entered, a success screen is displayed with the option to finish the donation process. Select the "Finish" button to complete.
Edit an existing donation record to update data related to the donation purchase.
- Log in as a staff user
- Open the App Launcher and select Nimble AMS
- Click the Accounts tab and change the list view to All Individual Accounts
- Select and open a person account to create a donation.
- Click the Add Donation button in the upper right of the screen.
- Fill out the Add Donation screens and select the "Next" button.
- When all input is entered, a success screen is displayed with the option to finish the donation process. Select the "Finish" button to complete.
- Under Related List Quick Links select "Donations" link
- Select the donation you would like to edit.
- Choose "Edit Donation" button in the upper right corner of the donation detail screen.
- Edit donation and save.
- The following fields should be available to edit:
- Soft Credit
- My Donation Is
- Honorary Name
- Honorary Message
- Honorary Address
- Memory Name
- Memory Message
- Memory Address
- Memorial Acknowledgement Name
- Chapter
Logged in Website User
Complete, update fields during my online donation process.
- Log in to Community Hub using a Website/Community Hub login, below.
- Select the "Donate Now" navigation link on the global menu (top of the screen)
- Click "Count Me In" next to the desired donation
- Begin filling out the Add Donation screens for the selected donation.
- When all input is entered, a success screen is displayed with the option to add another donation or finish the donation process.
- Select "Yes" and click the "Next" button to add another donation.
- You will return to the "donate" page where you can select another donation to add.
- Repeat steps 3 and 5 as many times as needed to add donations to the checkout cart.
- When done, select "No" and click the "Next" button to go to the checkout page.
- You are now at the My Checkout page and will see a list of all the donations being made
Expectations:
- A website user will be able to add multiple donations to an order within Community Hub
- The user can fill-in the following fields on the add donation screen:
- Anonymous
- My Donation Is
- Honorary Name
- Honorary Message
- Honorary Address
- Memory Name
- Memory Message
- Memory Address
- Memorial Acknowledgement Name
- Chapter
- At checkout, the user can see a display of multiple donations and a total amount.
- A new order will be created
- A donation record will be created for each donation product added to the order
- The user will be able to make a payment
- From the checkout screen the user will be able to
- add a stored payment
- make a one-time payment or set up a recurring payment
Website User: Make a one-time payment during my online donation process.
- Complete steps 1-9 from the previous step.
- Once on the My Checkout page,
- save a new credit card
- Complete billing address
- Select option to make a one-time Donation (default)
- Select the submit button at the bottom of the checkout screen.
- If successful, an invoice page will display.
- From the checkout screen the user will be able to
- add a new credit card payment
- make a one-time payment
- From the checkout screen the user will be able to
Website User: Make a recurring payment during my online donation process.
- Log in to Community Hub using a Website/Community Hub login, below.
- Select the "Donate Now" navigation link on the global menu (top of the screen)
- Click "Count Me In" next to "2022 BE the CAUSE Pledge"
- Once on the my checkout page, complete billing address
- Select the option to "Configure A Donation Frequency"
- Enter a recurring frequency
- Add a payment method and select the "Save" button.
- Select the Submit button at the bottom of the checkout screen.
- If successful, an invoice page will display.
- From the checkout screen the user will be able to
- add a new credit card payment
- make a recurring payment
Website User: Make a pledge payment during my online donation process.
- Complete steps 1-9 from the previous step.
- Once on the my checkout page, complete billing address
- Select the Pledge Option
- Selection the number of installments
- User should see how much the owe for the first installment
- Add a payment method and select the "Save" button.
- Select the Submit button at the bottom of the checkout screen.
- If successful, an invoice page will display.
- From the checkout screen the user will be able to
- add a new credit card payment
- make an installment payment
Website User: See a My Donation page
- If you have been logged into Community Hub and making donations, you can continue using that login account.
- Find and click the My Donations link in the left-hand menu
- User will see a summary of their current year donation history
Testing Accounts
Please use the following testing accounts when logging into the appropriate testing location as noted above.
The Username for each is the email address
>Website / Community Hub User Testing Accounts:
The Username for each is the email address
The Password for each Username below is: B1idxy82}
afpnimbletest+0@gmail.com (member account - US)
afpnimbletest+2@gmail.com (member account - US)
afpnimbletest+3@gmail.com (member account - CAN)
afpnimbletest+4@gmail.com (member account - CAN)
afpnimbletest+5@gmail.com (nonmember account - US)
afpnimbletest+6@gmail.com (nonmember account - US)
afpnimbletest+7@gmail.com (nonmember account - US)
afpnimbletest+8@gmail.com (nonmember account - CAN)
afpnimbletest+9@gmail.com (nonmember account - CAN)
>Chapter Admin (CCP) Testing Account:
Username: client+afp_staging_ccp@nimbleams.com
Password: @#F$SWDWA123_X_34ds.@FD!A
Note: The test account above is chapter admin for a number of chapters – this scenario is only for testing purposes. Most chapter admins will only see 1 chapter listed when they log in.
afpnimbletest+10@gmail.com (Paid Chapter Admin)
PW: @#F$SWDWA123_X_34ds.@FD!A
afpnimbletest+14@gmail.com (Paid Chapter Admin)
Password: SunStone65!
>Staff View Testing Accounts:
The Username for each is the email address
The Password for each Username below is: B1idxy82}
afpnimbletest+21@gmail.com
PW: B1idxy82}
afpnimbletest+22@gmail.com
PW: B1idxy82}
afpnimbletest+23@gmail.com
PW: SunStone65!
afpnimbletest+24@gmail.com
PW: B1idxy82}
afpnimbletest+25@gmail.com
PW: B1idxy82}